**How To** Re-keying an Ignition Switch
+10
overspray
peregrine67
rpm750
DiggerD
39coupe
71_georgia_beetle
meinvw
ASBug
zabo
fluxcap
14 posters
Page 1 of 1
 **How To** Re-keying an Ignition Switch
I guess I'm just picky (or too lazy to keeps keys separate) so I like having one key for all the locks on my car. I picked up an ignition switch a while back and decided to make it match an extra key I had laying around. Figured I'd take some pics in case anyone else ever wanted to do this. I have rekeyed 3 ingitions, a handful of door locks, glovebox lock and t-handle. I destroyed the first ignition and door lock I attempted because I didn't know what I was doing or how to take them apart. Hopefully this will help you avoid the same fate on your first try!
Big note to start with. Re-keying to use only one key will ONLY work if your lock cylinders are the SAME profile. Most early-mid 60's VWs used SC, SV, and SU profiles. If your door locks are SU and your ignition is SV, you are stuck with using 2 keys. However, if your door lock is SU23 and your ignition is SU121, you can make them match.
Let's get started.
The key cylinder is held in the switch by a circlip.

You have two choices to get this clip off.
1) you can use a small hook (maybe like a dental pick) to pull it off. I tried this way once and broke a bit of the raised bakelite that is around the clip. The switch still worked perfectly as that section really serves no function other than to get in your way when trying to take the clip off
2) Mount the switch in a vise, then use a punch and hammer to tap the cylinder (tap on the metal part directly in the middle of the picture). Give it a few good taps and the cylinder should pop out the front of the switch leaving the circlip and a washer. The clip and washer are small so put them somewhere you can easily find them later.
Note: If you have a key that will fit in the switch (doesn't have to operate the switch, just fit in there), put it in BEFORE removing the cylinder. Although unlikely, some of the wafers may be loose and if you don't have a key inserted, a wafer or two may go flying when you pull the cylinder out.

Here is the cylinder and the washer and circlip.
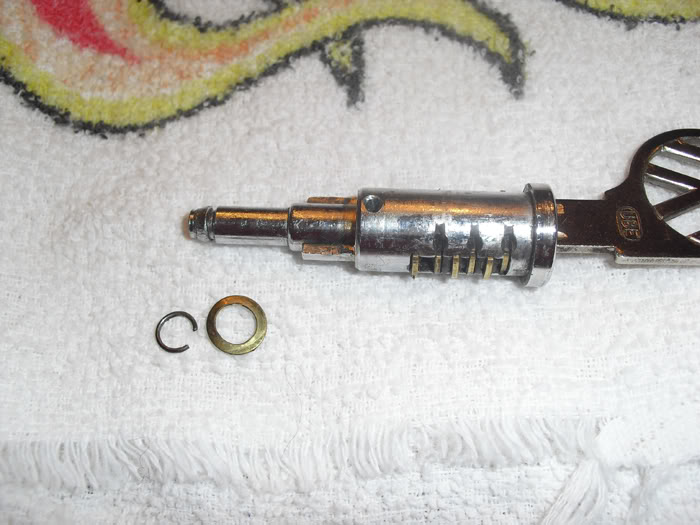
If the cylinder has never been worked on before, the wafers should stay in place with out the key. Here is a pic without the key. The wafers are spring loaded, so when there is no key, they will stick out of the cylinder.
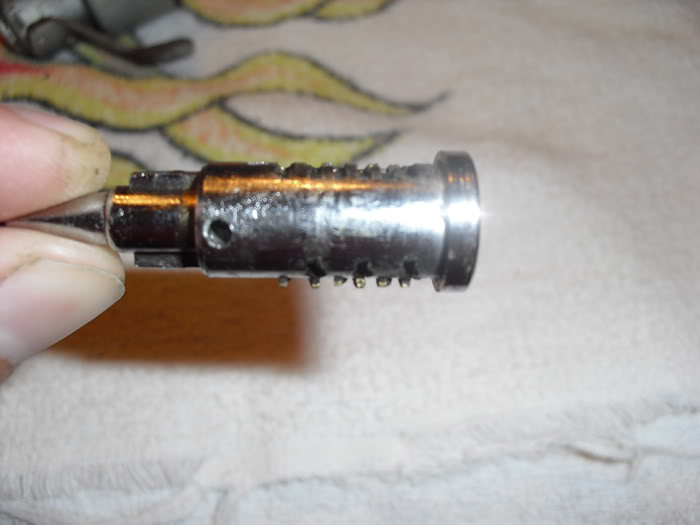
They fit in a slot inside the ignition switch, this keeps the cylinder from turning if the wrong key is inserted. You can see the slot here towards the bottom. There is also a slot up top 180 degrees opposite.
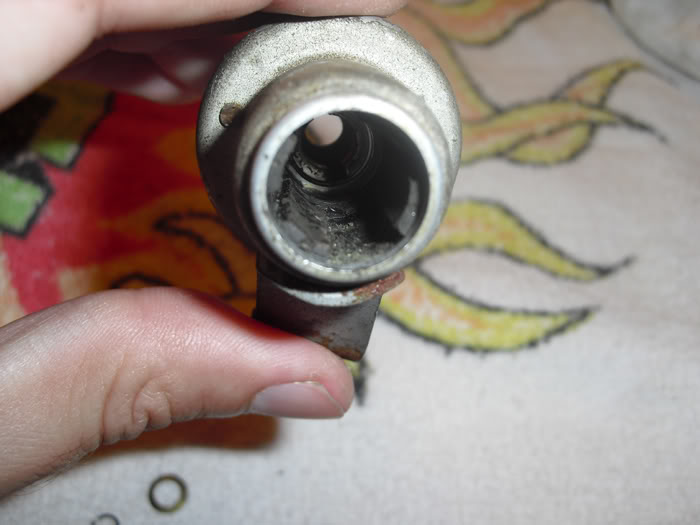
Now it's time to get the wafers out. There are 6 brass wafers in 6 slots. See the circular area at the end of each slot, when these are made originally, a punch is used at the circular area to create small tang. This tang keeps the wafers from falling out.
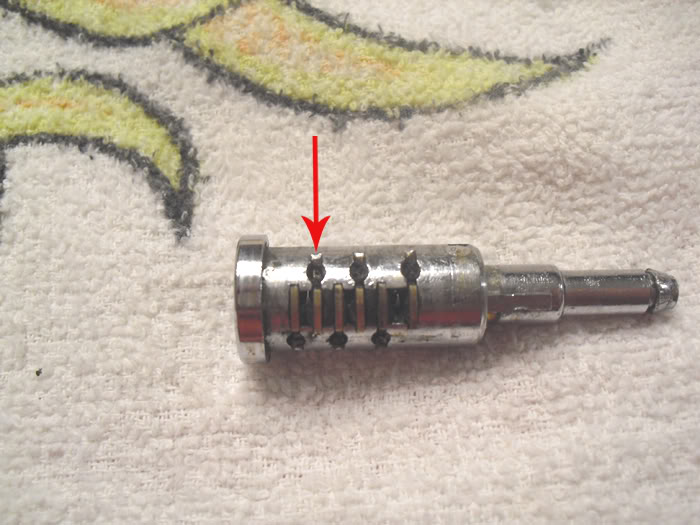
You'll have to use a small flathead screwdriver or pick, to remove this tang.

Once you pick enough of the tang away, the wafer should be able to be pull the wafer out.
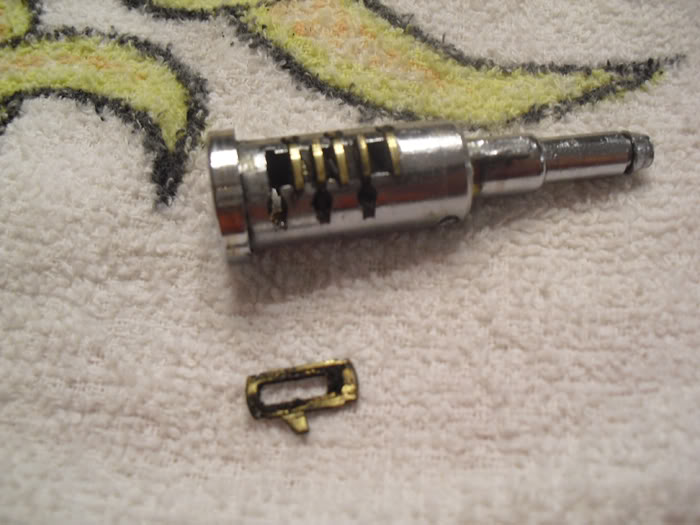
There is a very tiny spring still down in that circular area. You can barely make it out in this photo. Use a very small screwdriver, pick, or toothpick and gently work this spring out. Be careful, they can get out of shape easily. If you feel like it just doesn't want to come out, just leave it in there.
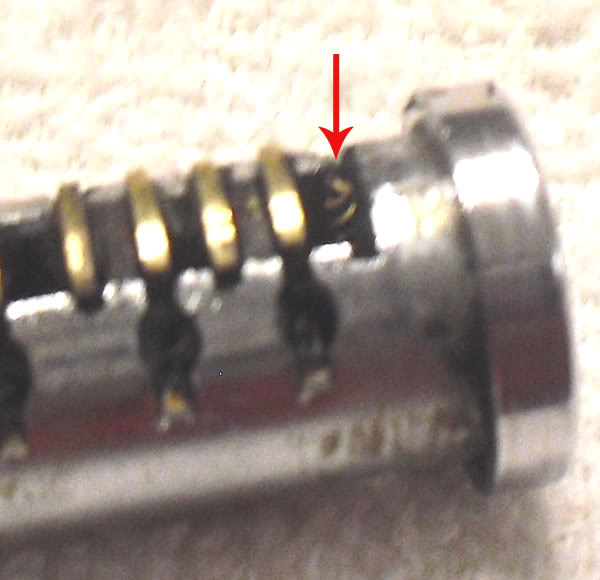
Here it is with all wafers and springs removed.
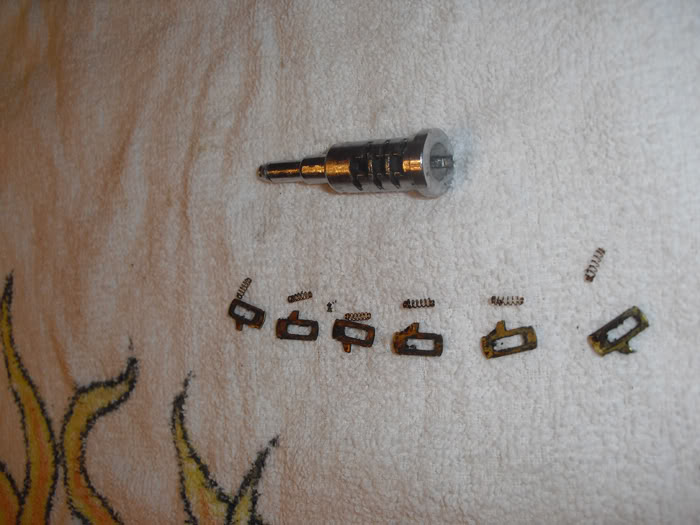
Now, take the cylinder and wafers outside and clean them with a little degreaser to get the years of dried up gunk off of them. I usually don't clean the springs for fear one will spring away and I'll never find it again.
Bring all the pieces back in to your work table. In total there are 6 wafers, but the wafers only have 3 different sizes. Lay them all down in order, and you will see that some wafers are the same. As you can see in this pic, all the wafers are the same height, but the hole in the center is offset between the three different variations. This is why the teeth on your key affects each wafer differently. I usually put them in a line and then separate them by the size of the top bar. I classify them as 1's, 2's, and 3's.
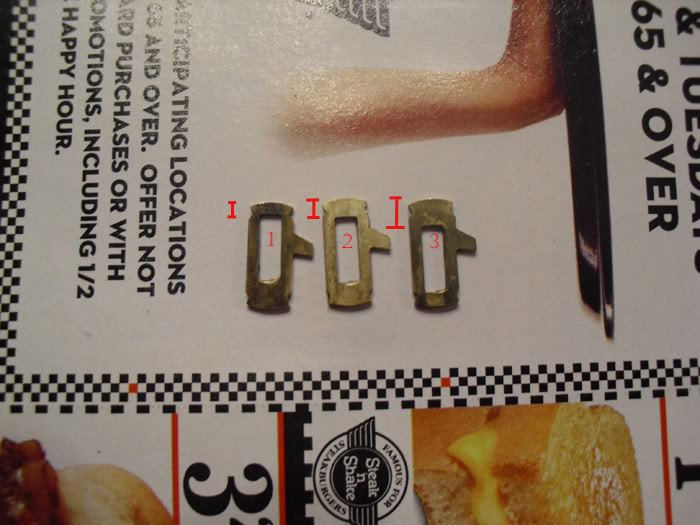
Helpful Hint: As I stated before there are only 3 different variations of wafers. The wafers in the cylinder you disassemble may or may not be the exact ones you need to fit your new key. I like to buy extra ignitions and locks any time I'm at a swap meet and find them dirt cheap. That way you will have extra wafers on hand. Now if you don't have extra wafers, there are other ways to make your swap work with the wafers you have. I'll mention those options later.
Now let's start our trial and error. Start at one end of the cylinder. Put in the first spring, then install a 1 wafer. Stick the key in and see how the wafer fits. Here is pic of mine with a 1 wafer in the first slot. Obviously, this is the wrong wafer for this slot.
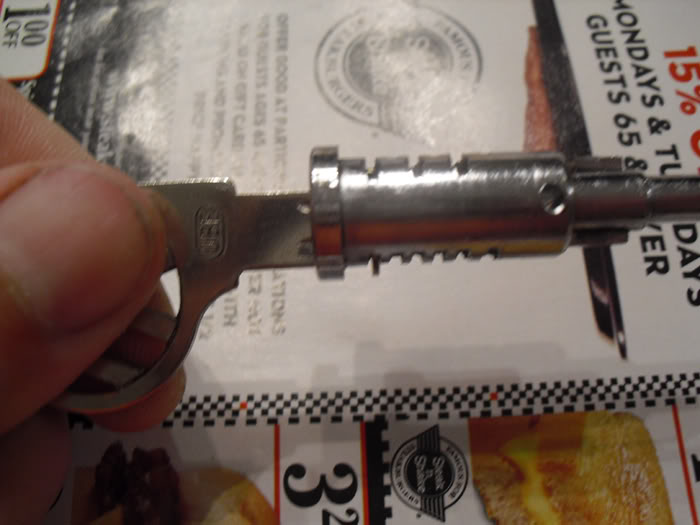
I then tried a 3 wafer and got this. Flush fit!
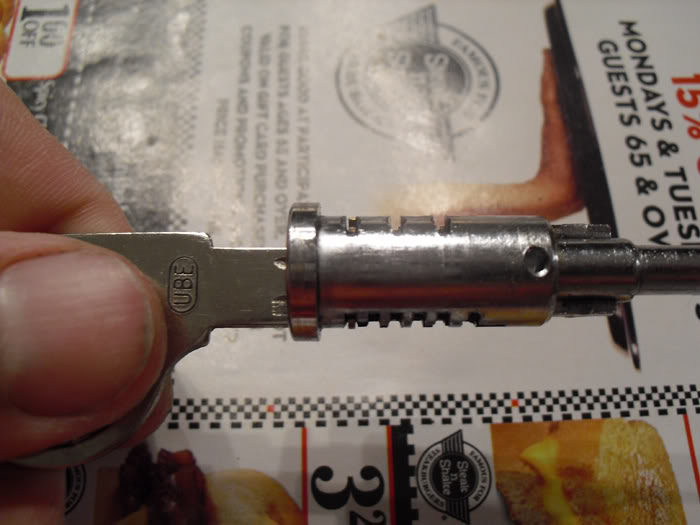
Work you way down the cylinder doing trial and error until you get this.
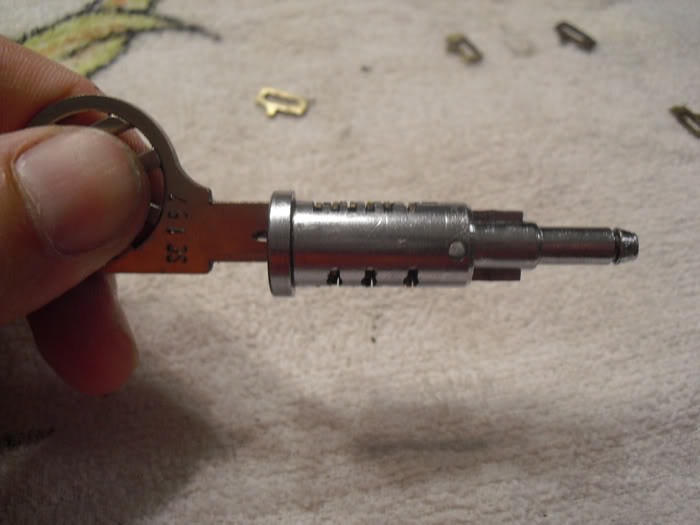
Here is the same wafer combination, with they key for my bug. This is obviously the wrong key, and wouldn't work this cylinder.
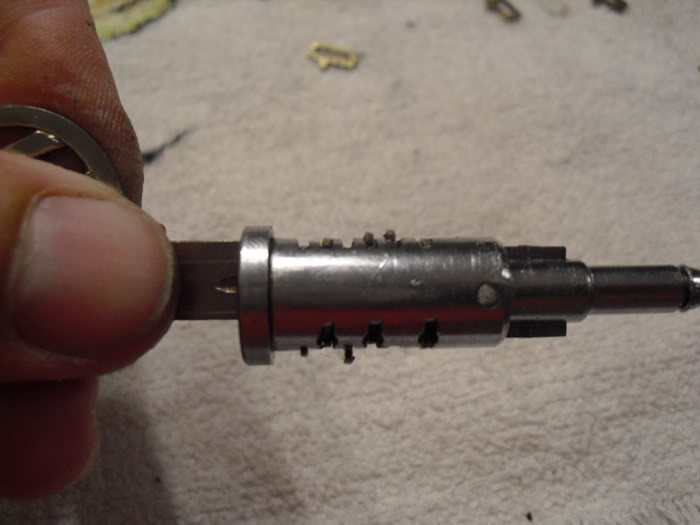
Note There is a chance the original wafers from you cylinder may not make a perfect combination with your new key. This is where the extra wafers come in handy. But if you don't have any extra wafers, here are your options. Get as many wafers as you can to line up correctly. Hopefully you'll only have 1 (maybe 2) that don't fit flush. If I only have 1 that doesn't fit flush, I usually just pull that wafer out and go without it. 5 out of 6 wafers is still pretty secure. It would be very slim odds that another key would work. If you are unlucky enough to have more than 1 wafer that doesn't fit flush, you can take a file, and file away any of the excess wafer until it does sit flush (or just pull that wafer also).
Once all the wafers fit flush, insert the cylinder back into the ignition switch and put the washer and circlip back on!
Final Note
You may get unlucky and have a spring come out when you first pull the cylinder out. Like this
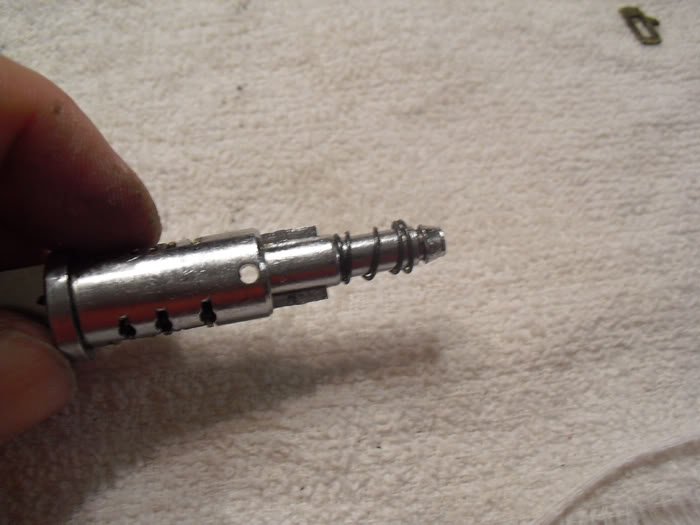
This pic shows where that spring goes

You'll have to feed that spring back in through the front opening. May have to use your small flathead screwdriver or pick to get it all the way down in there. If you don't get it seated all the way down, you may have a little trouble getting the cylinder all the way back in. I've done three switches and only had that spring come out once. It's not hard to get it back in, just make sure you have it all the way back down in there.
The wafer process is the same for door locks, glove box locks, and t-handles. The only thing that differs is getting the cylinder out of the lock. Most locks just have the cylinder held in place by a very tiny set screw. Remove that screw and the cylinder will just slide out.
Big note to start with. Re-keying to use only one key will ONLY work if your lock cylinders are the SAME profile. Most early-mid 60's VWs used SC, SV, and SU profiles. If your door locks are SU and your ignition is SV, you are stuck with using 2 keys. However, if your door lock is SU23 and your ignition is SU121, you can make them match.
Let's get started.
The key cylinder is held in the switch by a circlip.

You have two choices to get this clip off.
1) you can use a small hook (maybe like a dental pick) to pull it off. I tried this way once and broke a bit of the raised bakelite that is around the clip. The switch still worked perfectly as that section really serves no function other than to get in your way when trying to take the clip off
2) Mount the switch in a vise, then use a punch and hammer to tap the cylinder (tap on the metal part directly in the middle of the picture). Give it a few good taps and the cylinder should pop out the front of the switch leaving the circlip and a washer. The clip and washer are small so put them somewhere you can easily find them later.
Note: If you have a key that will fit in the switch (doesn't have to operate the switch, just fit in there), put it in BEFORE removing the cylinder. Although unlikely, some of the wafers may be loose and if you don't have a key inserted, a wafer or two may go flying when you pull the cylinder out.

Here is the cylinder and the washer and circlip.

If the cylinder has never been worked on before, the wafers should stay in place with out the key. Here is a pic without the key. The wafers are spring loaded, so when there is no key, they will stick out of the cylinder.

They fit in a slot inside the ignition switch, this keeps the cylinder from turning if the wrong key is inserted. You can see the slot here towards the bottom. There is also a slot up top 180 degrees opposite.

Now it's time to get the wafers out. There are 6 brass wafers in 6 slots. See the circular area at the end of each slot, when these are made originally, a punch is used at the circular area to create small tang. This tang keeps the wafers from falling out.

You'll have to use a small flathead screwdriver or pick, to remove this tang.

Once you pick enough of the tang away, the wafer should be able to be pull the wafer out.

There is a very tiny spring still down in that circular area. You can barely make it out in this photo. Use a very small screwdriver, pick, or toothpick and gently work this spring out. Be careful, they can get out of shape easily. If you feel like it just doesn't want to come out, just leave it in there.

Here it is with all wafers and springs removed.

Now, take the cylinder and wafers outside and clean them with a little degreaser to get the years of dried up gunk off of them. I usually don't clean the springs for fear one will spring away and I'll never find it again.
Bring all the pieces back in to your work table. In total there are 6 wafers, but the wafers only have 3 different sizes. Lay them all down in order, and you will see that some wafers are the same. As you can see in this pic, all the wafers are the same height, but the hole in the center is offset between the three different variations. This is why the teeth on your key affects each wafer differently. I usually put them in a line and then separate them by the size of the top bar. I classify them as 1's, 2's, and 3's.

Helpful Hint: As I stated before there are only 3 different variations of wafers. The wafers in the cylinder you disassemble may or may not be the exact ones you need to fit your new key. I like to buy extra ignitions and locks any time I'm at a swap meet and find them dirt cheap. That way you will have extra wafers on hand. Now if you don't have extra wafers, there are other ways to make your swap work with the wafers you have. I'll mention those options later.
Now let's start our trial and error. Start at one end of the cylinder. Put in the first spring, then install a 1 wafer. Stick the key in and see how the wafer fits. Here is pic of mine with a 1 wafer in the first slot. Obviously, this is the wrong wafer for this slot.

I then tried a 3 wafer and got this. Flush fit!

Work you way down the cylinder doing trial and error until you get this.

Here is the same wafer combination, with they key for my bug. This is obviously the wrong key, and wouldn't work this cylinder.

Note There is a chance the original wafers from you cylinder may not make a perfect combination with your new key. This is where the extra wafers come in handy. But if you don't have any extra wafers, here are your options. Get as many wafers as you can to line up correctly. Hopefully you'll only have 1 (maybe 2) that don't fit flush. If I only have 1 that doesn't fit flush, I usually just pull that wafer out and go without it. 5 out of 6 wafers is still pretty secure. It would be very slim odds that another key would work. If you are unlucky enough to have more than 1 wafer that doesn't fit flush, you can take a file, and file away any of the excess wafer until it does sit flush (or just pull that wafer also).
Once all the wafers fit flush, insert the cylinder back into the ignition switch and put the washer and circlip back on!
Final Note
You may get unlucky and have a spring come out when you first pull the cylinder out. Like this

This pic shows where that spring goes

You'll have to feed that spring back in through the front opening. May have to use your small flathead screwdriver or pick to get it all the way down in there. If you don't get it seated all the way down, you may have a little trouble getting the cylinder all the way back in. I've done three switches and only had that spring come out once. It's not hard to get it back in, just make sure you have it all the way back down in there.
The wafer process is the same for door locks, glove box locks, and t-handles. The only thing that differs is getting the cylinder out of the lock. Most locks just have the cylinder held in place by a very tiny set screw. Remove that screw and the cylinder will just slide out.

fluxcap- Dub Lieutenant General
- Number of posts : 3857
Location : Newnan, GA
Registration date : 2008-07-20
JWILL likes this post
 Re: **How To** Re-keying an Ignition Switch
Thank you.
KC
KC

ASBug- Dub God
- Number of posts : 2185
Age : 52
Location : Varnell, GA
Registration date : 2009-01-12
 Re: **How To** Re-keying an Ignition Switch
Great pic by pic thread. I have went thru the same in the past years and ended up only using 1 or 2 wafers so it would work. Yeah cheating, and probably 6 out of ten keys would start my bus! But learned over time how to do it, thanks for the thread, just where were you at 20 years ago!!!!!
Another tip is if trying it for the first time, get a cheap used cylinder to take apart and see how it works. Then you also have spare spings and wafers for when you lose a few! I now have a box of springs and wafers if anyone tries it and looses some.
Another tip is if trying it for the first time, get a cheap used cylinder to take apart and see how it works. Then you also have spare spings and wafers for when you lose a few! I now have a box of springs and wafers if anyone tries it and looses some.
 Re: **How To** Re-keying an Ignition Switch
One more note, when done re-grease them. Keep them from sticking in the future, also there is some room in there but sand the wafers with a light paper (800-1200). If you re-key one and later it does not work, heat the key up with a lighter and put it in and let it sit for a minute, if it works after that throw some graphite in there!
 Re: **How To** Re-keying an Ignition Switch
Awesome Eric. A man after my own heart (totally straight). I love pic filled, detailed instructions.
Very Nice!
On a side note, does anyone know if the later tumblers changed or if they have been the same since day one?
Very Nice!
On a side note, does anyone know if the later tumblers changed or if they have been the same since day one?
 Re: **How To** Re-keying an Ignition Switch
Thanks for the replies guys. Hopefully it will help out with future projects.

fluxcap- Dub Lieutenant General
- Number of posts : 3857
Location : Newnan, GA
Registration date : 2008-07-20
 Re: **How To** Re-keying an Ignition Switch
71_georgia_beetle wrote:Awesome Eric. A man after my own heart (totally straight). I love pic filled, detailed instructions.
Very Nice!
On a side note, does anyone know if the later tumblers changed or if they have been the same since day one?
Yeah, I'd be interested in that also. I'd like to rekey the door locks on the '73 to match my new ignition.
 Re: **How To** Re-keying an Ignition Switch
Same here, the 71 has two keys and one would be nice. If I can get all of them to match I will finally invest in one of those NOS key blanks.39coupe wrote:71_georgia_beetle wrote:Awesome Eric. A man after my own heart (totally straight). I love pic filled, detailed instructions.
Very Nice!
On a side note, does anyone know if the later tumblers changed or if they have been the same since day one?
Yeah, I'd be interested in that also. I'd like to rekey the door locks on the '73 to match my new ignition.
 Re: **How To** Re-keying an Ignition Switch
Nice, great write up!!  I will have to check my 71 and see if the one key fits everything or not. I'm not sure because I have never locked it........

DiggerD- Appointed Forum Smartass
- Number of posts : 2522
Location : Dacula, GA
Registration date : 2009-01-18
 Re: **How To** Re-keying an Ignition Switch
Eric If I find an SC profile switch at BAP will/can you key it to my door lock key?
 Re: **How To** Re-keying an Ignition Switch
rpm750 wrote:Eric If I find an SC profile switch at BAP will/can you key it to my door lock key?
Sure I will man! You to skeered to try it yourself?

fluxcap- Dub Lieutenant General
- Number of posts : 3857
Location : Newnan, GA
Registration date : 2008-07-20
 Re: **How To** Re-keying an Ignition Switch
Thanks you the break down. I need to find a few old lock cores and do this for the door locks on mine.
 Re: **How To** Re-keying an Ignition Switch
Thanks man ! this was helpful.. I have alot of old switches... and keys somewhere
 Re: **How To** Re-keying an Ignition Switch
Eric, this is magazine worthy. The magazine tech articles are never this detailed.
 Re: **How To** Re-keying an Ignition Switch
Clyde, I sure agree with you. Eric has taught this "Old Dog" new tricks that I saw that he did to his 62. He is very helpful. Jim Conner ....SlimJim

jim conner- Dub Nut
- Number of posts : 172
Age : 82
Location : Juliette, Georgia
Registration date : 2008-07-21
 Re: **How To** Re-keying an Ignition Switch
Thanks Eric got mine re keyed today!!

Dake- Dub Nut
- Number of posts : 148
Location : Newnan
Registration date : 2015-05-13
 Re: **How To** Re-keying an Ignition Switch
Awesome write-up and something you won't find on facebook! So glad this forum is still alive.
 Similar topics
» If You Start Me Up, Start Me Up I'll Never Stop...
» Leaking Ignition Coil
» What did you do to your volkswagen today?
» GAS to high, switch to Hydrogen!!!!
» Wiper switch malfunction
» Leaking Ignition Coil
» What did you do to your volkswagen today?
» GAS to high, switch to Hydrogen!!!!
» Wiper switch malfunction
Page 1 of 1
Permissions in this forum:
You cannot reply to topics in this forum