
66 Camper Bus "Bocephus"
Page 4 of 11 •  1, 2, 3, 4, 5 ... 9, 10, 11
 ![]()
Re: 66 Camper Bus "Bocephus"
![]() by type901 Wed Dec 28, 2011 9:40 pm
by type901 Wed Dec 28, 2011 9:40 pm
Man those corners are in really good shape.
type901- Dub Crazy
- Number of posts : 543
Location : McDonough
Registration date : 2010-03-06
Re: 66 Camper Bus "Bocephus"
![]() by fluxcap Thu Dec 29, 2011 4:57 am
by fluxcap Thu Dec 29, 2011 4:57 am
Yeah, the corners are pretty good. They have a few dings, but only a few pinholes I should be able to zap closed with the welder.

fluxcap- Dub Lieutenant General
- Number of posts : 3857
Location : Newnan, GA
Registration date : 2008-07-20
Re: 66 Camper Bus "Bocephus"
![]() by DOODLE BUGG Thu Dec 29, 2011 8:23 am
by DOODLE BUGG Thu Dec 29, 2011 8:23 am

DOODLE BUGG- Out of Control Dubber
- Number of posts : 1643
Age : 43
Location : logainville
Registration date : 2008-12-01 -

Re: 66 Camper Bus "Bocephus"
![]() by fluxcap Thu Dec 29, 2011 8:40 am
by fluxcap Thu Dec 29, 2011 8:40 am

fluxcap- Dub Lieutenant General
- Number of posts : 3857
Location : Newnan, GA
Registration date : 2008-07-20
Re: 66 Camper Bus "Bocephus"
![]() by type901 Thu Dec 29, 2011 8:45 am
by type901 Thu Dec 29, 2011 8:45 am
type901- Dub Crazy
- Number of posts : 543
Location : McDonough
Registration date : 2010-03-06
Re: 66 Camper Bus "Bocephus"
![]() by vwtattooed Thu Dec 29, 2011 8:10 pm
by vwtattooed Thu Dec 29, 2011 8:10 pm
thats half an air-ride setup Eric!! get some bags and you can hammer that thing!fluxcap wrote:Haha, I'd love to go 6-8 inches more, but that costs more money and time than I currently have. Maybe in the future, but for now I think I'll just let the air out of the tires when I get to the shows and then pump them up again when it's time to leave. I've got an old bicycle tire pump, so it shouldn't take to long.

vwtattooed- Complete Dub Addict
- Number of posts : 798
Location : griffin
Registration date : 2009-02-14
Re: 66 Camper Bus "Bocephus"
![]() by fluxcap Sun Jan 15, 2012 6:50 pm
by fluxcap Sun Jan 15, 2012 6:50 pm
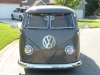
Sanded around the antenna area cause I could see a few small bondo cracks. Ended up finding a few more antenna holes. The antenna that came with the bus was the 5-hole antenna, but apparently it also at one time had a 2-hole antenna, and a 1-hole antenna that mounted on the lip right in front of the window.

Cut a small piece of metal to fill the hole and started welding it up.

All done, picture is taken from afar so you can't see my horrible welding skills

Next onto the weird hole on the lip in front of the window. Metal cut to fit and somewhat shaped to match the contour. I bumped the metal around the hole in just a tad so that I can get a pretty thick bead on it and finish matching up the contour when I grind the weld down.

It worked ok, still gonna take a lil bit of filler, but not much at all to get it looking right.

A few more progress pics shortly...
fluxcap- Dub Lieutenant General
- Number of posts : 3857
Location : Newnan, GA
Registration date : 2008-07-20
Re: 66 Camper Bus "Bocephus"
![]() by Raggtop Sun Jan 15, 2012 7:10 pm
by Raggtop Sun Jan 15, 2012 7:10 pm
The things you do to your Bus while your Hopped up on that Wacky Weed!!

Raggtop- Dub Nut
- Number of posts : 422
Location : Acworth, Ga.
Registration date : 2010-12-30 -
Re: 66 Camper Bus "Bocephus"
![]() by rpm750 Sun Jan 15, 2012 7:24 pm
by rpm750 Sun Jan 15, 2012 7:24 pm
Well you fixed that hole in a hurry. Looking good.

rpm750- Dub God
- Number of posts : 2258
Age : 59
Location : Out in the shop.
Registration date : 2008-11-11 -
Re: 66 Camper Bus "Bocephus"
![]() by SavannahVW Sun Jan 15, 2012 7:28 pm
by SavannahVW Sun Jan 15, 2012 7:28 pm
SavannahVW- Dub Nut
- Number of posts : 136
Location : Savannah, Georgia
Registration date : 2011-07-19
Re: 66 Camper Bus "Bocephus"
![]() by type901 Sun Jan 15, 2012 7:45 pm
by type901 Sun Jan 15, 2012 7:45 pm
type901- Dub Crazy
- Number of posts : 543
Location : McDonough
Registration date : 2010-03-06
Re: 66 Camper Bus "Bocephus"
![]() by fluxcap Sun Jan 15, 2012 8:08 pm
by fluxcap Sun Jan 15, 2012 8:08 pm
After the nose was done, I move on to the passenger side. Removed the 8 screws that use to hold mounts for tent poles and also removed the 7 snap buttons that were riveted above the cargo doors (I did atleast have some rivets Phillip!).


Flattened a piece of copper pipe to hold behind the holes and went to town. Still got to get the rear ones once I remove the wardrobe closet.

Also welded up the two holes on the door from the giant truckers mirror that used to be on there.
Finally, I moved on to the battery trays. The passenger side one was one of the orange ones (don't know who sold it), and it fit horribly. But I got it in tacked in there. It was a pain in the but welding in the spot welds on the bottom side along the curve!
After a little paint.

And some seam sealer on the top and bottom to keep the water out. Need to go back and put a little paint on the seam sealer so it doesn't stick out so much.

Got the drivers side welded in just a few hours ago. Got a little phosphoric acid on it to kill any rust that may still be there and keep it clean until I get it cleaned up and get some paint on it. It was a black one and it fit 1000 times better than the orange one. They were both with the bus when I bought it, so I have no idea who sold the black one either.

Me and my dad pulled the z-bed out and figured out why it wouldn't lay all the way down. This catch piece was cracked at the red line and it had been bent into and L-shape instead of being straight. It's spring loaded so when the seat is pulled up it was falling back (due to being bent) and was blocking the seat from laying all the way flat.

The catch piece on the other side was completely broken off, so it was doing the same thing. Didn't get a chance to fix it, but nothing a couple of quick zaps of the welder won't fix!

fluxcap- Dub Lieutenant General
- Number of posts : 3857
Location : Newnan, GA
Registration date : 2008-07-20
Re: 66 Camper Bus "Bocephus"
![]() by DiggerD Sun Jan 15, 2012 8:41 pm
by DiggerD Sun Jan 15, 2012 8:41 pm
Looking forward to seeing it in person once its back on the road!

DiggerD- Appointed Forum Smartass
- Number of posts : 2522
Location : Dacula, GA
Registration date : 2009-01-18

Attorney Isaiah Loophole- Dub General
- Number of posts : 4988
Age : 37
Location : Griffin, GA
Registration date : 2008-07-20 -
Re: 66 Camper Bus "Bocephus"
![]() by fluxcap Sun Feb 05, 2012 8:22 am
by fluxcap Sun Feb 05, 2012 8:22 am
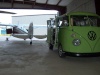
Finally, I spent the last few nights taking my headlights completely apart and getting the rust out of the buckets. Primed and painted the buckets and installed all new seals and rubber bits and added some Bosch H4 units I got from busdepot. I put these in my bug a while back and it was probably the best thing I ever did to that car. Amazing difference between standard headlights.
fluxcap- Dub Lieutenant General
- Number of posts : 3857
Location : Newnan, GA
Registration date : 2008-07-20
Re: 66 Camper Bus "Bocephus"
![]() by bumblebuggy Sun Feb 05, 2012 8:25 am
by bumblebuggy Sun Feb 05, 2012 8:25 am
bumblebuggy- Out of Control Dubber
- Number of posts : 1921
Location : McDonough
Registration date : 2008-07-24
Re: 66 Camper Bus "Bocephus"
![]() by fluxcap Sun Feb 05, 2012 8:29 am
by fluxcap Sun Feb 05, 2012 8:29 am
Good to know though, I never tried there cause I figured they wouldn't have the correct sized ends. I'll check there first next time!
fluxcap- Dub Lieutenant General
- Number of posts : 3857
Location : Newnan, GA
Registration date : 2008-07-20
Re: 66 Camper Bus "Bocephus"
![]() by bumblebuggy Sun Feb 05, 2012 8:36 am
by bumblebuggy Sun Feb 05, 2012 8:36 am
bumblebuggy- Out of Control Dubber
- Number of posts : 1921
Location : McDonough
Registration date : 2008-07-24
Re: 66 Camper Bus "Bocephus"
![]() by Major62 Sun Feb 05, 2012 9:13 am
by Major62 Sun Feb 05, 2012 9:13 am
Looking good Eric man you definately got bitten by the Bus Bug - Well you know....
Java green is a nice choice - of course 2 tone is not bad either.

Major62- Dub Nut
- Number of posts : 285
Age : 59
Location : Roswell
Registration date : 2008-09-21
Re: 66 Camper Bus "Bocephus"
![]() by 56rag Sun Feb 05, 2012 10:21 am
by 56rag Sun Feb 05, 2012 10:21 am

56rag- Dub Nut
- Number of posts : 373
Location : ellijay
Registration date : 2008-12-28
Re: 66 Camper Bus "Bocephus"
![]() by fluxcap Sun Feb 05, 2012 10:44 am
by fluxcap Sun Feb 05, 2012 10:44 am
Yeah Jeff, they are the same. Does look like they have some fairly cheap ones (around $20) on amazon. May get one of those for future use. Thanks
fluxcap- Dub Lieutenant General
- Number of posts : 3857
Location : Newnan, GA
Registration date : 2008-07-20
Re: 66 Camper Bus "Bocephus"
![]() by bumblebuggy Sun Feb 05, 2012 10:54 am
by bumblebuggy Sun Feb 05, 2012 10:54 am
bumblebuggy- Out of Control Dubber
- Number of posts : 1921
Location : McDonough
Registration date : 2008-07-24
Re: 66 Camper Bus "Bocephus"
![]() by Grifspop Sun Feb 05, 2012 12:13 pm
by Grifspop Sun Feb 05, 2012 12:13 pm
bumblebuggy wrote:I'm lazy. I just measure and get the length I need.
Plus, if you don't get the flare right, what a pain!!
Grifspop- Dub God
- Number of posts : 2323
Location : Someplace you wouldn't think to look
Registration date : 2009-04-14
Re: 66 Camper Bus "Bocephus"
![]() by fluxcap Thu Feb 16, 2012 7:51 pm
by fluxcap Thu Feb 16, 2012 7:51 pm
Started working on the front windshield area. Had a thin layer of old crusty paint and light rust at the bottom of the window area, so I went to town on it with one of those hard spongy disc thingys that fit in a drill.
Got it down to nice clean metal.

Had two really small pinholes on the passenger side lip, so I closed them up, and then treated the area with phosphoric acid to take care of any rust I may have missed. Cleaned that off, then filled in the pitting with some 3m spot putty. Then backed it over to the garage door, taped it up, and hit it with some primer and krylon.

My 3-point seatbelts arrived today, so tomorrow I'm planning on cutting small access holes in the lower b-pillars, fishing some nut plates to the upper B-pillar and getting my upper mounts in place, then weld up the access holes. Found a great how-to on the samba for this, so hopefully it won't take long. If that goes well, I'll probably start bleeding the brakes. Wish me luck!!!
I can work on the rest of the paint a little at a time, but been wanting to finish this are so I can get some windows in and actually drive it.
Windows in, all by myself, and didn't even break one!!!!

Now that I got the rear mounts for the bed in place, I went ahead and put the gas tank in. Had to wait a few more days as I found my old sender unit was completely gummed up and had no movement. Got the new sender in a few days ago, and got the tank in. The german engineers were good, but they really could have made just a little more room to get the tanks in. That was a 30 minute wrestling match, but I finally got the dang thing in place.

fluxcap- Dub Lieutenant General
- Number of posts : 3857
Location : Newnan, GA
Registration date : 2008-07-20
Re: 66 Camper Bus "Bocephus"
![]() by Attorney Isaiah Loophole Thu Feb 16, 2012 8:58 pm
by Attorney Isaiah Loophole Thu Feb 16, 2012 8:58 pm
Attorney Isaiah Loophole- Dub General
- Number of posts : 4988
Age : 37
Location : Griffin, GA
Registration date : 2008-07-20 -
Page 4 of 11 • 1, 2, 3, 4, 5 ... 9, 10, 11 ![]()